Thanks to modern medicine, I’m back crafting again!!! Woooohooo! I’ve been so busy trying to get caught up on making my Christmas cards and envelopes — and getting them in the mail by Friday this past week — I did not have time to even think about blogging as I did them. However, I did take pictures before I mailed them. So, here are the ones I put in the mail this week…. (I did some earlier that you can see in previous posts). I still have a few more to do, and I will try to post them later.
It always amazes me how many different products I use when I make a card. I never really noticed until I started listing the supplies for each card. While it may look daunting to someone new to this craft, it’s really not any worse than say….a recipe for a cake.
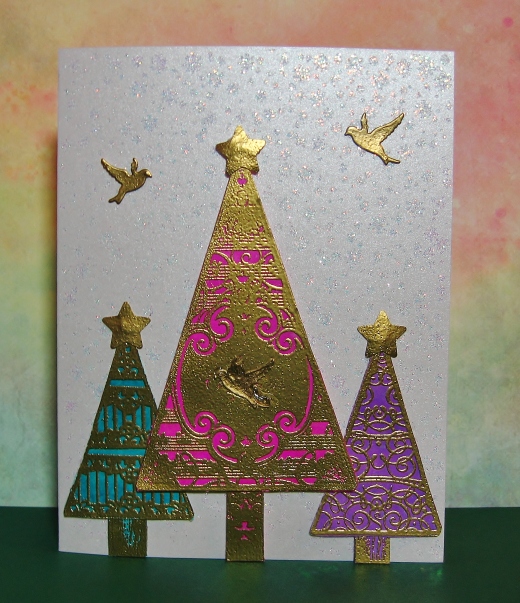
Card 1: Gold Trees Trio
I added glossy accents to the bird in front of the middle tree to help make it stand out.
Supplies:
- Card Base – Papertrey Ink Shimmer Cardstock
- Other Cardstock/paper – Glossy Cardstock
- Color Mediums – Adirondack Alcohol Blending Solution, Adirondack Pearl Mixative, Adirondack Alcohol Inks (Stream, Purple Twilight, & Raspberry)
- Dry Mediums – Ranger Holographic Embossing Powder, Ranger Super Fine Detail Gold Embossing Powder
- Die – Impression Obsession Bird Bath [birds] (www.iostamps.com)
- Ink – Versamark
- Background Stamp – Rubbernecker Snowflake Panel (www.rubbernecker.com/snowflake-panel.html)
- Stamps – JustRite “O Christmas Tree” (www.justritepapercraft.com/products/o-christmas-tree-clear-stamps-cr-02235)
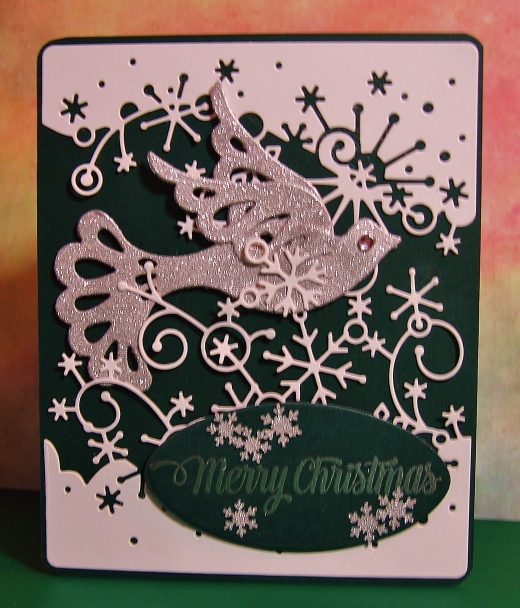
Card 2: Dove Card
Supplies:
- Card Base – Gina K. Pure Luxury Navy Cardstock (www.shop.ginakdesigns.com/)
- Other Cardstock/paper – Neenah Solar White, DCWV Glitzy Glitter Cardstock Stack 12″x12″
- Dry medium – Ranger Super Fine Detail Silver Embossing Powder
- Punch – Martha Stewart Aspen, punch around the page [mini snowflakes] (www.amazon.com/Martha-Stewart-Crafts-Punch-Around/dp/B002XOQ9WO/ref=sr_1_8?ie=UTF8&qid=1387687849&sr=8-8&keywords=Martha+Stewart+Snowflake+border)
- Die – Memory Box Swirling Snowflakes Die, Sizzix Framelits Ovals; Marianne Design Creatables LR0149 [bird] (www.ucutathome.com/store/product/Marianne-Design-Creatable-Dies-Creatables-Die-Fantasy-Bird/id/10002)
- Ink – Versamark
- Stamp – My Favorite Things Cheerful Christmas Greetings stamp set (www.mftstamps.com/index.php?route=product/product&filter_name=Cheerful+Christmas&product_id=2233)
- Other – bling from my stash (for the eye)
Card 3: Gingham Card
Supplies:
- Card Base – Solid Cherry Red Card Stock 100#, 8 1/2 x 11 from www.paperandmore.com
- Other Cardstock/paper – Bazzill Basics Paper Nordic Pines 6″x6″ paper pad
- Dry Mediums – Ranger Super Fine Detail Black Embossing Powder, Tim Holtz Distress Fired Brick Embossing Powder
- Die – Papertrey Ink Edgers #1 & #2 (www.papertreyink.com)
- Punch – Martha Stewart Aspen, punch around the page [mini snowflakes] (www.amazon.com/Martha-Stewart-Crafts-Punch-Around/dp/B002XOQ9WO/ref=sr_1_8?ie=UTF8&qid=1387687849&sr=8-8&keywords=Martha+Stewart+Snowflake+border)
- Ink – Versamark
- Stamp – My Favorite Things Cheerful Christmas Greetings stamp set (www.mftstamps.com/index.php?route=product/product&filter_name=Cheerful+Christmas&product_id=2233)
- Other – Mistletoe Single Cord from Lawn Fawn (www.lawnfawn.com), Dress It Up! Christmas Button assortment from JoAnn’s (I removed the shank and glued on with Glossy Accents)
Card 4: Pink and Silver Peace Card
I apologize for the quality of the picture of this card — it does not do it justice. I took a couple of pictures before mailing it, but none of them turned out well — I should have checked before I mailed it!
Supplies:
- Card Base – Papertrey Ink Silver Shimmer Cardstock
- Other Cardstock/paper – Grafix Vellum
- Color Mediums – Viva Décor Mother of Pearl Rose Modellier Creme
- Dry Mediums – Ranger Super Fine Detail Silver Embossing Powder
- Stencil – Crafter’s Workshop Snowflake stencil
- Ink – Versamark
- Stamp – Papertrey Ink Think Big Favorites #9 (www.papertreyink.com/stamps/think-big-favorites-9-mini-stamp-set/)
- Other – Double-faced Pink Satin Ribbon from Papermart.com (www.papermart.com/fabric-satin-ribbon/id=33122#33122)
Card 5: Silver LaBlanche
Supplies:
- Card Base – Neenah Solar White
- Other Cardstock – DCWV Glitzy Glitter Cardstock Stack 12″x12″, Ponderosa Pine Linen cardstock from www.paperandmore.com
- Dry Mediums – Ranger Super Fine Detail Silver Embossing Powder
- Ink – Versamark
- Embossing Folder – Sizzix Flowers #6 A2 Large
- Stamp – LaBlanche Tree with Notes
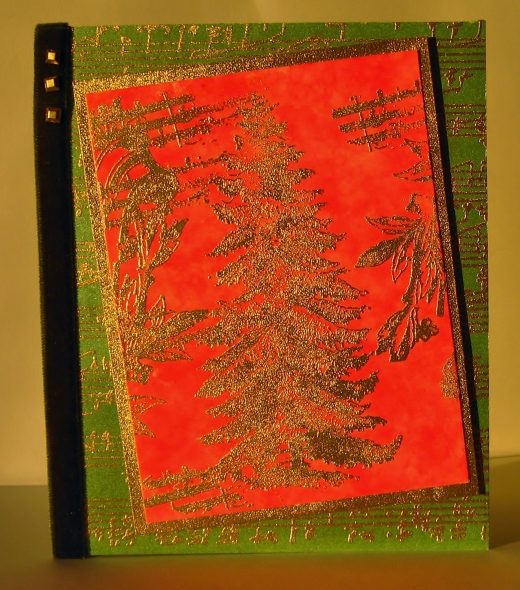
Card 6: Gold LaBlanche
Supplies:
- Card Base – Neenah Solar White
- Other Cardstock/paper – Pearlescent Metallic Paper, Text Weight from Paperandmore.com (colored with green ink pad to make green background that was stamped with music background); Glossy Cardstock (colored with alcohol inks)
- Color Mediums – Adirondack Alcohol Blending Solution, Adirondack Pearl Mixative, Adirondack Alcohol Ink (Red Pepper)
- Dry Mediums – Ranger Super Fine Detail Gold Embossing Powder
- Ink – Versamark
- Background Stamp – Impression Obsession MUSIC Cover-A-Card Background – CC029 (www.iostamps.com)
- Stamp – LaBlanche Tree with Notes
- Other – 3/8″ Hunter Velvet Ribbon from www.papermart.com, embellishments from stash
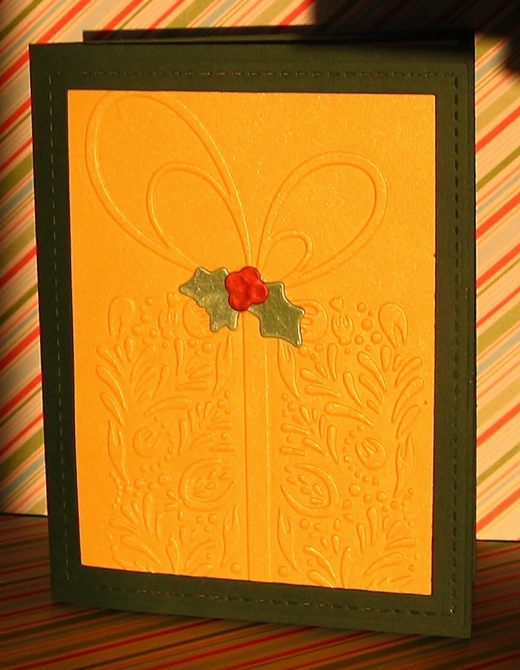
Card 7: Present Card
I love the simplicity of this card.
Supplies:
- Card Base – Ponderosa Pine Linen #80 cardstock from www.paperandmore.com
- Other Cardstock/paper – Papertrey Ink Shimmer (Gold, Scarlett (berries), Leaf (leafs) )
- Embossing Folder – Couture Creations Giving Embossing Folder
- Die/Stamp – Lil’ Inker Designs Stitched Rectangle Mats (www.lilinkerdesigns.com), WPlus9 Merry & Bright Dies and stamps (www.wplus9.com)
Card 8: Candle Card
Supplies:
- Card Base – WPlus9 Cranberry Cardstock
- Other Cardstock/paper – Papertrey Ink Shimmer (Gold (candle flame), Scarlett (berries), Leaf (leafs) ), The Paper Studio Old World Winter (4.5″ x 6.5″ paper pad), Acetate, Neenah Solar White (inside)
- Dies – Lil’ Inker Designs Stitched CIrcle Mats (www.lilinkerdesigns.com), Creative Time Dies Fun Stitched Edges (shop.my-creative-time.com/main.sc)
- Die/Stamp – WPlus9 Merry & Bright Dies and stamps (www.wplus9.com/)
- Ink – Versamark
- Embossing Folder – Anna Griffin
Card 9: Joy Card
Supplies:
- Card Base – Papertrey Ink Scarlet Shimmer
- Other Cardstock/paper – Bo Bunny Silver & Gold 6″x6″ (for ornament border)
- Punch – EK Success for ornament border
- Die – Savvy Dies Joy typed #10144 (www.savvystamps.com)
- Other – ribbon from www.papermart.com, Distress Stickles, Wink of Stella
Card 10: Liquid Pearl Wreath
Supplies:
- Card Base – Solid Cherry Red Card Stock 100#, 8 1/2 x 11 from www.paperandmore.com
- Other Cardstock/paper – Lawn fawn Peace, Love, Joy 6″x6″ paper pad
- Dies – My Favorite Things Die-namics Blueprints 1 & 6
- Ink – Memento Bamboo Leaves; Ranger Archival Vermillion
- Stamp – Papertrey Ink Holiday Cheer Stamp set
- Other – Sakura Stardust Gelly Roll Pens (lime star, red); Liquid Pearls (Ocean Blue, Key Lime, Rouge, Bisque); Sequins from Lawn Fawn
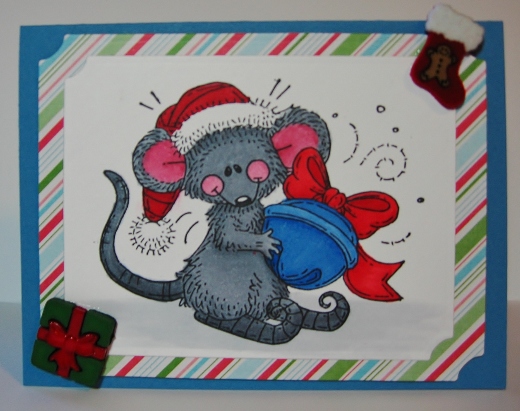
Card 11: Christmas Mouse
I made this card for my almost-2-years-old great-nephew. He’s at the stage where he has to touch and feel everything – so I put the two embellishments on his card for his entertainment! 🙂 One is fuzzy and velvet-y feeling and the other is hard and bumpy.
Supplies:
- Card Base – Papertrey Ink cardstock
- Other Cardstock/paper – American Crafts Deck The Hall Stripes; Neenah Solar White
- Dies – Spellbinders Large Labels
- Color medium – Copics C3, C5, C7 (body); R24, R27, R29 (hat & bow); R81, R83, R85 (cheeks & ears); B23, B26 (bell), 0
- Stamp – Whimsy Stamps Elf Bell Mouse
- Other – Dress It Up! Buttons with shanks removed (present & stocking)
Card 12: Man Wreath
The card has a little something extra – a fabulous woodsy/chocolately/coffee scent! I sprinkled Elements Earth Textures Cacao over the wet embossing paste. It gives a great texture and scent to this simple, manly Christmas card! 🙂
Supplies:
- Card Base – Gina K. Chocolate Cardstock
- Other Cardstock/paper – Papertrey Ink Shimmer (Scarlet & Leaf)
- Dry medium – Elements Earth Textures Cacao
- Dies – Tim Holtz Sizzix Holiday Wreath Die
- Other – Crafter’s Workshop Mini Woodgrain 6″x6″; Dreamweaver Translucent Embossing Paste; Liquid Pearls (Buttercup, Royal Blue, Rouge)
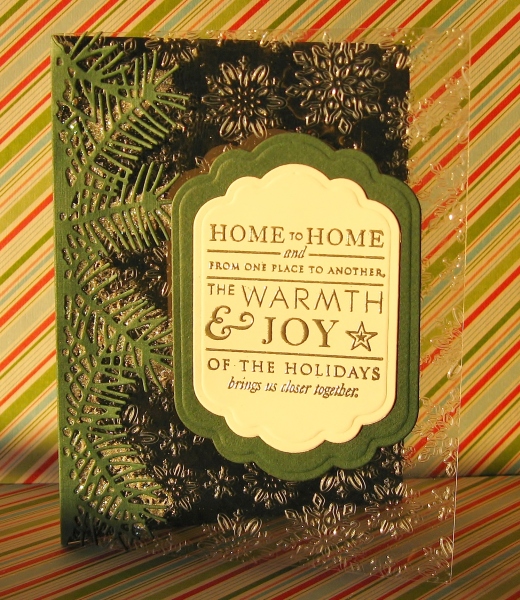
Card 13: Pine Border Acetate Card
I used a die to create the pine border as part of the back of the card. Using my ATG, I ran adhesive along the back of the pine branches and adhered a cut acetate panel. Then, I covered the adhesive with an iridescent glitter – which successfully covered the adhesive and just looks like ice/snow on the branches. The acetate panel was embossed with an embossing folder for texture.
Supplies:
- Card Base – a combination of Ponderosa Pine Linen cardstock and acetate
- Other Cardstock/paper – Neenah Solar White
- Dry medium – Ranger Super Fine Detail Silver Embossing Powder
- Die – Spellbinders Labels Eleven; Memory Box Pine Needle Border
- Ink – Versamark
- Stamp – Papertrey Ink Stylish Sentiments: Holiday
- Other – Veneer Prisma Embossing Powder
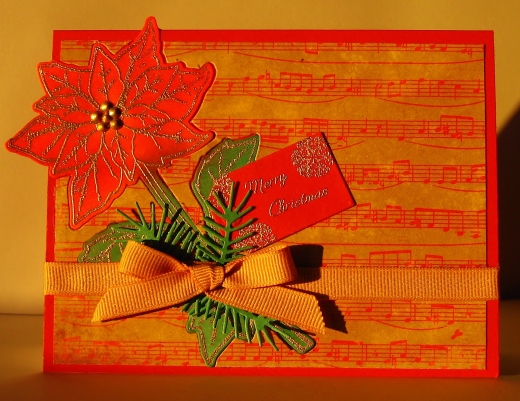
Card 14: Poinsettia Music Card
This card utilizes the paper “inlay” technique. The poinsettia is actually inlaid in the music paper.
Supplies:
- Card Base – Solid Cherry Red Card Stock 100#, 8 1/2 x 11 from www.paperandmore.com
- Other Cardstock/paper – Bazzill Basics Paper Nordic Pine paper pad; Neenah Solar White
- Dry medium – Ranger Super Fine Detail Gold Embossing Powder
- Die – Memory Box Poinsettia Stem Die, Poppy Stamps Pine Springs, My Favorite Things Blueprints 2 (tag)
- Ink – Distress Ink Barn Door, Distress Ink Festive Berries, Distress Ink Pine Needles, Distress Ink Evergreen Bough
- Stamp – Memory Box Poinsettia Stem Stamp (G1790),
- Other – Liquid Pearls Gold, Gold ribbon
Card 15: Embossed Ornament Card
This card is absolutely stunning in person. Lots of shine!
Supplies:
- Card Base – Papertrey Ink Shimmer Cardstock in White Shimmer and Sea Shimmer
- Dry medium – Ranger Super Fine Detail Silver Embossing Powder
- Die – My Favorite Things Blueprints 1 (strip); Creative Time Dies Fun Size Scallop Stitched Bow Die (http://shop.my-creative-time.com/Fun-Size-Scallop-Stitched-Bow-Die-MCT-D57.htm?categoryId=-1)
- Ink – Versamark
- Stamp – Papertrey Ink Holly Jolly (sentiment)
- Embossing Folder – Spellbinders M-Bossibilities EL-014 Holiday Magic
- Other – Wink of Stella
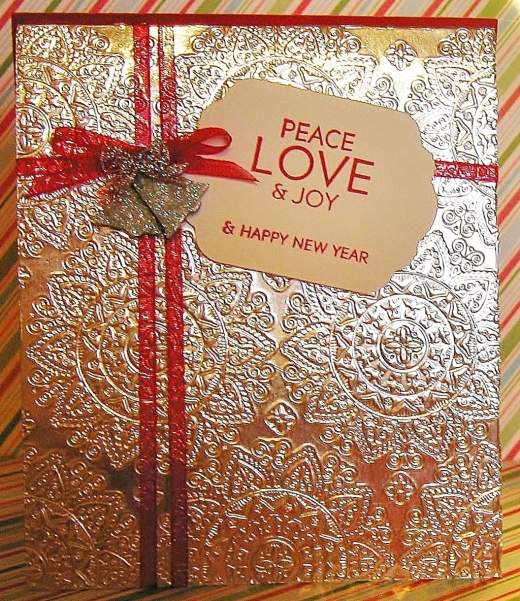
Card 16: Foil Tape Present Card
The foil really makes the embossed design pop on this card!
Supplies:
- Card Base – Solid Cherry Red Card Stock 100#, 8 1/2 x 11 from www.paperandmore.com
- Other Cardstock/paper – Papertrey Ink Stamper’s Select White cardstock; Shrink Film
- Dry medium – Ranger Super Fine Detail Silver Embossing Powder
- Impression Plate -Papertrey Ink Mehndi Medallion Impression Plate
- Die – Papertrey Ink Bells and Boughs dies (to make embellishments from Shrink Film)
- Ink – Staz-On Blazing Red, Staz-On Metallic Silver
- Stamp – Papertrey Ink Bells and Boughs stamps
- Other – Silver Foil Tape, Veneer Prisma Glitter, Glossy Accents
Card 17: Little Birdie Get Well
While this is not a Christmas card, it could easily be adapted to one! My BFF and her hubby and her mother all came down with the Flu over Thanksgiving and this was a Get Well card for them.
I really like the white-on-white embossed brick on the white cardstock.
Supplies:
- Card Base – Solid Cherry Red Card Stock 100#, 8 1/2 x 11 from www.paperandmore.com
- Other Cardstock/paper – Neenah Solar White
- Dry medium – Opaque White embossing powder
- Die – Memory Box Branch Die; Papertrey Ink Tweet Talk Die set
- Ink – Versamark
- Stamp – Papertrey ink Tweet Talk Stamp set; Impression Obsession C-A-C Brick
Hope you all are ready for the holidays, and I wish you all the happiest of holidays with family and friends. May you and yours be full of Joy and Peace this holiday season. Warmest Hugs and Wishes, Stephanie
