A Die-cut Christmas

Howdy folks!  It’s been a long while since I posted last.  Too many challenges with health and well-being, along with the great planning and excitement of my oldest son’s graduation from college! 🙂  I can’t tell you enough about how proud I am of his accomplishments!  He has a job lined up – 2 days after graduation – and starts in January 2015.

Since I have a bunch of pictures of the cards I made for this Christmas – I will list supplies for all of them at the end of this post.  I tried to remember everything I used, but I may have missed something – so if you have any questions, please leave me a comment, and I will try to address it as soon as I can.

While I own more stamps than any one woman should have, I also am in the same predicament with steel dies.  I love, love, love them!  The front of all the cards were done solely with dies – with the exception of one card.  All of the insides of the cards, however, do have stamped sentiments (from Penny Black’s Christmas Cheer stamp set).

Without further ado ….

Xmas Set 1 Xmas Set 2 Xmas Set 3 Xmas Set 4 Xmas Set 5 Xmas Set 6 Xmas Set 7 Xmas Set 8 Xmas Set 9 Xmas Set 10 Xmas Set 11 Xmas Set 12

I used really pretty shimmer cardstock and the pictures do not do them justice!  Even the shimmer from the Zig’s Wink of Stella pen does not show well in these pictures.  I guess I need to invest in a better camera – these are taken from a little digital camera — any recommendations?  I hear the DSLR cameras are great.   Any thoughts about the  Canon EOS Rebel T5 DSLR?  I noticed the reviews on Amazon are great (and the prices for the camera and accessories packages are dropping).

I wish everyone a very Merry Christmas, Happy Holidays, and pray for better health and happiness for the rest of this year and in 2015!  Don’t be a stranger! 🙂

Hugs,

Stephanie

Supply List

Stamps

Penny Black’s Christmas Cheer

Waltzingmousestamps.com Seasonal Flourish

Dies 

Memory Box Frosted Christmas Tree

Memory Box “Bells Are Ringing” (98683)

Memory Box Pine Needle Border (98467)

Memory Box Cosmic Star Set (98464)

Memory Box Holly Vine (98188)

Memory Box Grand Merry Christmas (98680)

Memory Box Gabriella Border (98649)

My Favorite Things’s Dienamics “MERRY” Photo Frame (mftstamps.com)

Savvy Dies “JOY”

Impression Obsession’s Small Snowlakes (iostamps.com DIE100-F)

Marianne Creatables Pine Branch (LR-0181)

Cottage Cutz Winter Pine Branch (CCE-045)

Lil’ Inker Designs Stitched Snowflakes (lilinkerdesigns.com)

Cheery Lynn Designs “Bows and Bells” (cheerylynndesigns.com DL163)

Dee’s Distinctively Christmas Tree #3

Simon Says Stamp “Merry Christmas” Die

Simon Says Stamp Falling Stars Die Plate

Craft Dies by Sue Wilson “Holly Accessory Kit” (CED3014)

Papertrey Ink’s One Liners Die Collection (papertreyink.com)

Spellbinders Ovals

Spellbinders Matting Sets A & B

Embossing Folders 

Stampin’ Up Textured Impressions Square Lattice

Anna Griffin Swedish Bells

Embossalicious Die’sire “Let It Snow”

Sizzix Tim Holtz Alterations Sheet Music A2

Darice Basketweave

Paper – Bases

Paperandmore.com Wood Grain Lumba White 111# (Best woodgrain paper out there IMHO)

Paperandmore.com Pine Linen Cardstock 80#

Paperandmore.com Cherry Red Cardstock 100#

Papertreyink.com Shimmer Paper – Cream, White, Scarlet, Raspberry

Paper – Accents 

Paperandmore.com Pearl Metallic 107# (5×7)

Paperandmore.com Gold Metallic 105# (5×7)

Paperandmore.com Crimson Red Metallic 105# (5×7)

Paperandmore.com Fairway Green Metallic 105# (5×7)

Bo Bunny Mistletoe  (6×6)

DCWV Burlap Mat Stack

DCWV Glitter Cardstock (6×6)

Lawn Fawn Peace, Love, Joy (6×6)

Fancy Pants “Oh, Deer” (6×6)

Carta Bella “So This Is Christmas” (6×6)

Crate Paper “Bundled up” (6×6)

Other 

Aluminum Tape

Ranger’s Tim Holtz Distress Inks – Mowed Lawn, Barn Door

Marvy Uchida Liquid Applique

Bling and pearls from stash

Various ribbons from Papermart.com

Versamark

Ranger Super Fine Detail Embossing Powder (sentiments inside some cards)

Memento Luxe Northern Pine Pigment Ink (inside some cards)

Ranger Liquid Pearls – Buttercup  (for some reason, it went  on great, but by next day -everything was a blob!

End of  Supplies

Holiday Card Workshop 2013 – Homework for Day 2

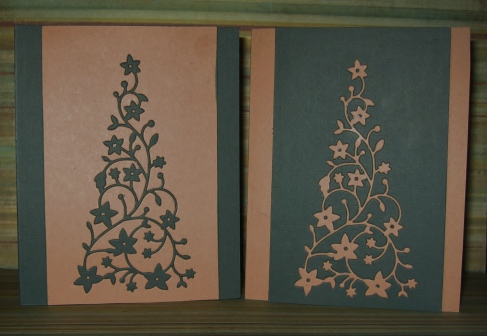
The second day of class focused on layered die cut inlay, suspended die cuts, positive and negative die cuts, and unique die cut folds!  My absolute favorite of the techniques is the die cut inlay technique.  I think the more detailed the die cut, the more striking the inlay technique!  It is a technique that can stand on it’s own – without a lot of fuss or embellishment.  You just have to make sure you keep ALL the bits that are die cut!  On the two cards I made below, after I die cut the image, I carefully lifted the entire piece of paper from the plate and put a piece of Eclipse masking sheet over the entire die cut- this kept all the tiny pieces in order and made it easier to find the pieces that went into the inlay.  I die cut a green piece of paper and a kraft piece of paper and then switched the main image for the inlays.

ImageThe image was so elegant on it’s own, I put the sentiment on the inside of the card.  It reads “Joy & Peace , Wishing You the Happiest of Holidays” and is from Hero Arts.

Supplies:

  • Card bases/panels – Ponderosa Pine Linen from paperandmore.com; Kraft cardstock from kraftoutlet.com
  • Inside – Neenah Solar White
  • Die – Memory Box Flowering Christmas Tree Die
  • Ink – Ranger Adirondack Bottle Pigment Ink (for stamping inside sentiment)
  • Stamp – Hero Arts Sparkle with Happiness Sentiment stamp set CL648

Happy Holiday Hugs! Stephanie

OCC Summer Camp 2 – Week 1, Day 2, Card 3

Back again, for the last time today,  with a card using the first sketch image and incorporating the stamping on paint technique demonstrated by the talented Tami Hartley. I used Ranger’s Adirondack Paint Dabbers to make splotches of color on white cardstock. After drying, I stamped a zebra pattern, in WPlus9 white pigment ink (which is my favorite white pigment ink ever!).  The flap front was cut to size and then dry embossed with a zebra Cuttlebug embossing folder.  The “hello” was die cut with a die from My Favorite Things Happy Hellos die set –  5 times and glued together.  The first piece was cut from white cardstock that had also been stamped with the zebra stamp using one of the acrylic paints.  Here it is…

ImageIt was finished off with a scattering of acrylic gems from Studio G (Michael’s product).  The color of the gems match the orangish paint, but the paint color and gem color are a bit “off” in this picture – possibly due to lighting? Hmmm. I adhered a white panel underneath for a place to write a personal message.

Have a good evening, and I hope to see your creations tomorrow! Hugs!

Margie’s Fantabulous Frog Fronts!

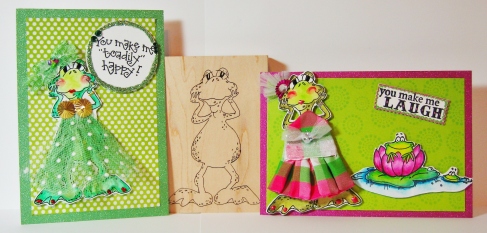
My super-uber talented friend, Margie, is up for a visit from Texas! Yea!  As we usually do when we get together, we create AND spend lots of time laughing  and giggling up a storm! (You are NEVER too old to giggle!)  She made these two fantabulous card fronts (she’s still thinking about what color base to put them on) with her usual creative flare and whimsical style! Love, love, love these!!!! lol

ImageI keep telling Margie that she needs to start her own blog to share all her creative genius with everyone.  I tell you all, that woman is totally talented!!!

The stamp for her focal images is from Stamps by Judith (http://www.stampsbyjudith.com/?q=node/1160) , S-46 Large Standing Frog.  She also used Penny Black’s My Flower! stamp from the Margaret Sherry collection.

The sentiment “You Make Me Laugh” is from Fiskars You Make Me Laugh Quote set.  The sentiment “You Make Me Toadily Happy” is from Penny Black and is called Toadily.

She stamped the focal image on Canon Recycled Bristol paper, colored the image with Derwent Inktense pencils and blended with a water brush. She then fussy cut the image.  It is mount on patterned paper. The papers used are from DCWV Glitzy Glitter Mat Stack brights 4.5″x6.5″ paper pad, The Paper Studio’s Lola and Luca 4.5″x6.5″ paper pad and The Paper Studio’s Adhesive Simplicity 4.5″ x 6.5″ paper pad.  She used a ton of detail in embellishing the frog images – sequins for the the “madonna-like top” (grin) and for the detail in the hat, various tulles from papermart.com, Ranger’s liquid pearls, (for toe nail polish, lipstick, bracelets, earrings), ribbon,Ranger’s black enamel accents, and Ranger’s glossy accents.

Please leave Margie some “love” here in the comment section!  Hugs!

My Stamping Royalty Entry in the Hello/Thinking of You Category

I only had one entry into this category.

Image

These are the details I submitted with this card –

  1. Make 5” x 6” card base from white cardstock.
  2. Make panels from gray cardstock in  4”x5”, and 3. 5” x 4.5” and make  a panel from white cardstock in  4”x5”.
  3. Layer panels from large to small on card base. Adhere with repositional tape to keep panels in position while stamping.
  4.  Ink stamp with Versamark and stamp.
  5.  On gray panels, use white embossing powder and heat emboss. On white panels, use silver embossing powder and heat emboss.
  6. Die cut white cardstock with die; stamp sentiment with Versamark; then, heat emboss with silver embossing powder.
  7. Assemble card panels, aligning stamped images. Tie ribbon around front panel of card base. Adhere die cut with dimensional adhesive.

Supplies:

Paper:   AC Cardstock, White Heavy Weight 80lb,www.paperandmore.com ‘s Charcoal Linen Cardstock 80lb

Stamps: Inkadinkado Morphic Flowers – Daisies.Simon Says Stamp Apothecary Labels Clear Stamp Set

Color/Ink: Versamark.StampendousDetail White Opaque Embossing Powder, Ranger Super Fine Detail Embossing Powder –  Silver

Tools: Fiskars Premium Cut Line Paper Trimmer – 12 inches,Martha Stewart Scoring Board, Simon Says Stamp Apothecary Label Die set, Sakura Silver Gelly Roll Pen, Signo Uniball White Gel Pen, Scotch Permanent Double Stick Tape, Dimensional Adhesive

Other: www.papermart.com 3/8” silver shimmer organza ribbon

TIPWhen embossing with white powder, “mistakes” during embossing can usually be fixed with the Signo Uniball White Gel Pen. Similarly, when embossing with silver embossing powder, the Sakura Gelly Roll Pen can be used to fill in small areas where embossing powder may be missing.


Cloud9 Blog Hop Entry

Well, I did complete an entry for the blog hop, and I did get a couple of things that I am so excited about! I ordered their cranberry ink – which looks scrumptious by the way! – and I heard great things about  their white ink over on splitcoaststampers.com, so I thought I would give that a spin as well!  Without further ado, here is my entry –

Image

Products used:

  • Stamps: WPlus9 Damask Doilies set
  • Papers: Neenah Solar White, Gina K. Navy, Paperandmore.com Red, Basic Grey PB&J
  • Punches & Dies: Spellbinders Long Classic Rectangles Large
  •  Inks/Color Mediums: Versamark, Ranger Super Fine Detail Gold Embossing Powder, Embossing Pen
  • Other: Blue satin ribbon with gold trim from Papermart.com, Scor-Tape

I created the background paper with the smallest doily from the set with gold embossing. The bottom part of the background is design paper from Basic Grey that I used an embossing pen/gold embossing powder on to highlight parts of the design and to tie it in with the gold embossing on the top part.  I used Scor-tape to adhere the navy blue ribbon across the center, but since it wasn’t the right shade of navy, I added a red paper strip across the middle to also to in the matting on the card.

Please leave a comment and let me know what you think about it! :)

Another Card – I missed the deadline! Ooooopss

Unfortunately, I was too late to post this to their challenge, but I wanted to share it with everyone anyway! lol Last week’s cue card word challenge at CASology (http://casology.blogspot.com/) was UP.  Their Design Team (DT) have some fantastic takes on this challenge!  It’s so easy to get inspired by all their craftiness!  I decided to go UP in a tree with a couple of birds, UP in the clouds. Here is my take – ImageI used an adhesive cardstock paper for the sun (Paper Studio’s Adhesive Simplicity – found at Hobby Lobby) and used the large Fiskars circle punch to make 2 “suns” which I adhered back to back on the back of the card to it looks nice from either side.

Products used:

  • Stamps: Whimsy Stamps (www.whimsystamps.com) Time Flies Sentiment Set (I cut the “wings” off this sentiment to use it here.  It doesn’t hurt the stamp – I can still use it as it was designed. You just have to be careful when cutting images that are close together.)
  • Papers: Neenah Solar White cardstock, AC Texture White 80lb cardstock, Paperandmore.com’s Solid Tiffany Blue Cardstock #100 (used scraps from a previous card)
  • Punches & Dies: MFT Die-namics Jumbo Cloud Stax; Fiskars Large Circle Punch, Memory Box Woodland Branch, Poppy Stamps (http://www.poppystamps.com/) Nestled Bird
  •  Inks/Color Mediums: Ranger Archival Jet black ink
  • Other: Ranger’s Glossy Accents (birds and heart)

Please leave a comment and let me know what you think about it! :)

Runway Inspired Challenge #33

This week’s challenge at http://www.runwayinspired.blogspot.com/ is all about Red Valentino – however, the inspiration pic has no red in it! lol  Here is the inspiration :

And here is my interpretation of it in card form –

Image

Products used:

  • Stamps: Hero Arts/Basic Grey Flower Medley Background (CG432); sentiment from Hero Arts You & Me set (CL567)
  • Papers: Grafix Vellum, Neenah Solar White, Bazzill pink and yellow, Paperandmore.com Black Solid #100 cardstock
  • Punches & Dies: EK Success Paper Shapers Small Flower Power Punch; EK Success 1 1/2″ Circle Punch (vellum circle); Memory Box Vintage Apothecary jar; C.C. Designs Cutters Leafy Branch
  •  Inks/Color Mediums: Hero Arts Charcoal Mid-Tone Shadow Ink, Memento Tuxedo Black marker, Ranger Archival Jet black ink, Pebbles Chalks – Pastels. Prismacolor Colorless Blender, C1 Copic Marker (shading right side of vase)
  • Other: Gray crafter’s cord from Hemptique’s Vintage collection (which I colored black to match); self-adhesive acrylic pearls from Michael’s; black grosgrain ribbon from papermart.com. Ranger’s Glossy Accents (vase)

You will also find this card in the Hero Arts Flickr Group with the tag April2013A. Details on the Hero Arts April contest can be found at  http://heroarts.com/blogs/club/april-2013-contest-details/ .

Please leave a comment and let me know what you think about it! 🙂