A Die-cut Christmas

Howdy folks!  It’s been a long while since I posted last.  Too many challenges with health and well-being, along with the great planning and excitement of my oldest son’s graduation from college! 🙂  I can’t tell you enough about how proud I am of his accomplishments!  He has a job lined up – 2 days after graduation – and starts in January 2015.

Since I have a bunch of pictures of the cards I made for this Christmas – I will list supplies for all of them at the end of this post.  I tried to remember everything I used, but I may have missed something – so if you have any questions, please leave me a comment, and I will try to address it as soon as I can.

While I own more stamps than any one woman should have, I also am in the same predicament with steel dies.  I love, love, love them!  The front of all the cards were done solely with dies – with the exception of one card.  All of the insides of the cards, however, do have stamped sentiments (from Penny Black’s Christmas Cheer stamp set).

Without further ado ….

Xmas Set 1 Xmas Set 2 Xmas Set 3 Xmas Set 4 Xmas Set 5 Xmas Set 6 Xmas Set 7 Xmas Set 8 Xmas Set 9 Xmas Set 10 Xmas Set 11 Xmas Set 12

I used really pretty shimmer cardstock and the pictures do not do them justice!  Even the shimmer from the Zig’s Wink of Stella pen does not show well in these pictures.  I guess I need to invest in a better camera – these are taken from a little digital camera — any recommendations?  I hear the DSLR cameras are great.   Any thoughts about the  Canon EOS Rebel T5 DSLR?  I noticed the reviews on Amazon are great (and the prices for the camera and accessories packages are dropping).

I wish everyone a very Merry Christmas, Happy Holidays, and pray for better health and happiness for the rest of this year and in 2015!  Don’t be a stranger! 🙂

Hugs,

Stephanie

Supply List

Stamps

Penny Black’s Christmas Cheer

Waltzingmousestamps.com Seasonal Flourish

Dies 

Memory Box Frosted Christmas Tree

Memory Box “Bells Are Ringing” (98683)

Memory Box Pine Needle Border (98467)

Memory Box Cosmic Star Set (98464)

Memory Box Holly Vine (98188)

Memory Box Grand Merry Christmas (98680)

Memory Box Gabriella Border (98649)

My Favorite Things’s Dienamics “MERRY” Photo Frame (mftstamps.com)

Savvy Dies “JOY”

Impression Obsession’s Small Snowlakes (iostamps.com DIE100-F)

Marianne Creatables Pine Branch (LR-0181)

Cottage Cutz Winter Pine Branch (CCE-045)

Lil’ Inker Designs Stitched Snowflakes (lilinkerdesigns.com)

Cheery Lynn Designs “Bows and Bells” (cheerylynndesigns.com DL163)

Dee’s Distinctively Christmas Tree #3

Simon Says Stamp “Merry Christmas” Die

Simon Says Stamp Falling Stars Die Plate

Craft Dies by Sue Wilson “Holly Accessory Kit” (CED3014)

Papertrey Ink’s One Liners Die Collection (papertreyink.com)

Spellbinders Ovals

Spellbinders Matting Sets A & B

Embossing Folders 

Stampin’ Up Textured Impressions Square Lattice

Anna Griffin Swedish Bells

Embossalicious Die’sire “Let It Snow”

Sizzix Tim Holtz Alterations Sheet Music A2

Darice Basketweave

Paper – Bases

Paperandmore.com Wood Grain Lumba White 111# (Best woodgrain paper out there IMHO)

Paperandmore.com Pine Linen Cardstock 80#

Paperandmore.com Cherry Red Cardstock 100#

Papertreyink.com Shimmer Paper – Cream, White, Scarlet, Raspberry

Paper – Accents 

Paperandmore.com Pearl Metallic 107# (5×7)

Paperandmore.com Gold Metallic 105# (5×7)

Paperandmore.com Crimson Red Metallic 105# (5×7)

Paperandmore.com Fairway Green Metallic 105# (5×7)

Bo Bunny Mistletoe  (6×6)

DCWV Burlap Mat Stack

DCWV Glitter Cardstock (6×6)

Lawn Fawn Peace, Love, Joy (6×6)

Fancy Pants “Oh, Deer” (6×6)

Carta Bella “So This Is Christmas” (6×6)

Crate Paper “Bundled up” (6×6)

Other 

Aluminum Tape

Ranger’s Tim Holtz Distress Inks – Mowed Lawn, Barn Door

Marvy Uchida Liquid Applique

Bling and pearls from stash

Various ribbons from Papermart.com

Versamark

Ranger Super Fine Detail Embossing Powder (sentiments inside some cards)

Memento Luxe Northern Pine Pigment Ink (inside some cards)

Ranger Liquid Pearls – Buttercup  (for some reason, it went  on great, but by next day -everything was a blob!

End of  Supplies

OCC Summer Camp 2 – Week 1 Day 1

Today is the official start of Summer Camp 2 at onlinecardclasses.com! Wooohoo!  I find that attending classes, such as this one, force me to think outside the box and inspire me to sit down and get creating- especially when there is HOMEWORK!  Today’s lesson combines using a specific color palette with the option of using one of three sketches.

I chose the second sketch – putting my own personal spin on it! Instead of using different colored strips of cardstock, as demonstrated by Kristina in class, I decided to go with a piece of designer paper that has stripes of chevrons in varying colors – including the colors in this week’s color palette. Here is my card –

Image

The card base is Gina K.’s Pure Luxury cardstock in Blue Raspberry.  Both the orange and yellow frames were cut from DCWV cardstock  with Lil’ Inker Designs Stitched Circles and Stitched Rectangle dies.  I just love these dies!  The small rectangle was also cut with a die from the set -using chevron paper from Basic Grey’s Kneehigh 6×6 paper pad.  The “you” die cut with a die from Cheery Lynn Designs. The sentiments on the chevron rectangle were stamped with Versamark and heat embossed with Super Fine Detail Embossing Powder from Ranger.  The sentiments are from Simon Says Stamps “BE” clear stamp set.  The texture on the cardbase and the white circle were made with Papertrey Ink’s Linen Impression Plate.

It’s not too late to sign up and join in the fun! Take care all! Hugs!

Wishing You Weren’t So Far Away Card

Hi all!  I decided to spend time weeding my flower beds this past week!  One of the conditions I am challenged by is called Mixed Connective Tissue Disease, and when I spend time doing physical activity, I spend two to three times that to recover!  So I weeded one day, slept/rested for two, weeded again on day, slept/rested for two days…you get my drift — so I’ve been too tired to make anything!  I am hoping to do some challenges this week if all goes well! 🙂

I did manage to make this card for a special someone who’s just too far away for me to see as often as I like! I used Twinkling H2Os directly on the stamp image to stamp, and then blended in another color to shade the flower.  The background is also Twinkling H2Os watercolored in streaks across the page — I thought it added great texture and shine to the card, overall.

ImageThe only thing I think I would do different on this card, next time, is to heat emboss the sentiment in white so it would stand out a bit more. Later gator! Hugs!

Moxie Fab World Tuesday Trigger – Pretty Little Petit Fours

There’s still time to play along with this past Tuesday’s Trigger at Moxie Fab World – just click on the inspirational image to get to the challenge page –

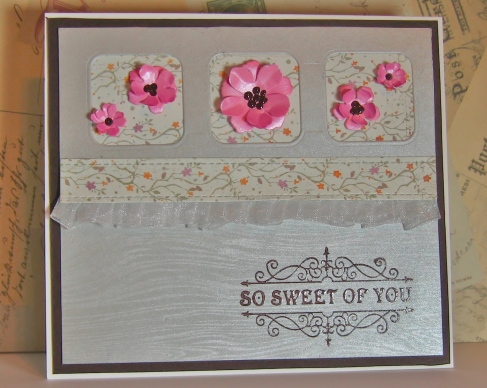
I love the pink flowers and the woodgrain platter in this photo. The silver serving spoon adds a touch a class to the over all picture.   Here is my take on this image –

Image

Believe it or not, the dark mat, the sentiment and the centers of the flowers are all a very dark brown — no matter how many times I took the picture, adjusted the lighting, etc – the brown looks black in the picture.  Guess I need to take a photography class!  Anyone have any recommendations?  I stamped a woodgrain pattern on the lower part of the card in platinum (on silver cardstock) – the pattern is very soft but adds great texture to the card.

Hope you all have a wonderful Sunday!  Hugs!

My Stamping Royalty Entry in the Hello/Thinking of You Category

I only had one entry into this category.

Image

These are the details I submitted with this card –

  1. Make 5” x 6” card base from white cardstock.
  2. Make panels from gray cardstock in  4”x5”, and 3. 5” x 4.5” and make  a panel from white cardstock in  4”x5”.
  3. Layer panels from large to small on card base. Adhere with repositional tape to keep panels in position while stamping.
  4.  Ink stamp with Versamark and stamp.
  5.  On gray panels, use white embossing powder and heat emboss. On white panels, use silver embossing powder and heat emboss.
  6. Die cut white cardstock with die; stamp sentiment with Versamark; then, heat emboss with silver embossing powder.
  7. Assemble card panels, aligning stamped images. Tie ribbon around front panel of card base. Adhere die cut with dimensional adhesive.

Supplies:

Paper:   AC Cardstock, White Heavy Weight 80lb,www.paperandmore.com ‘s Charcoal Linen Cardstock 80lb

Stamps: Inkadinkado Morphic Flowers – Daisies.Simon Says Stamp Apothecary Labels Clear Stamp Set

Color/Ink: Versamark.StampendousDetail White Opaque Embossing Powder, Ranger Super Fine Detail Embossing Powder –  Silver

Tools: Fiskars Premium Cut Line Paper Trimmer – 12 inches,Martha Stewart Scoring Board, Simon Says Stamp Apothecary Label Die set, Sakura Silver Gelly Roll Pen, Signo Uniball White Gel Pen, Scotch Permanent Double Stick Tape, Dimensional Adhesive

Other: www.papermart.com 3/8” silver shimmer organza ribbon

TIPWhen embossing with white powder, “mistakes” during embossing can usually be fixed with the Signo Uniball White Gel Pen. Similarly, when embossing with silver embossing powder, the Sakura Gelly Roll Pen can be used to fill in small areas where embossing powder may be missing.


Runway Inspired Challenge #34 – Reem Acra

Time again for another fabulous challenge at http://www.runwayinspired.blogspot.com/ ! Here is the inspiration photo –

I love the black floral/leafy pattern on the white background!  The red lipstick adds just the right touch of drama!  Here is my take on all that drama –

Image

From this front view, you can see the hints of red behind the raised petals of the card. The following view gives you more of the dimension on this card –

Image

I just love the hint of red peeking out from underneath the petals! After I cut out the card shape, I stamped the Impression Obsession Greenery background with Versamark and heat embossed with a black sparkly embossing powder. I backed the front of the card stock with red cardstock and used dimensional adhesive to lift the petals.  The sentiment is from Hero Arts and the banner die is from Simon Says Stamps.

On a side note, if you like to make your own paper or you love digi stamps or card kits- this website, http://www.paperprintables.com/index.html, has a wide assortment of freebies!  Enjoy!